Tuesday, May 7, 2019

Fabulous & Vibrant Art Journal Page With Tags How To Featuring Rita Barakat Designs & Ken Oliver Color Bursts

Hello! Welcome ALL!

Today here on INSPIRE, 
is the Rita Barakat Designs & Ken Oliver Colorburst Collab Blog Hop!

For my project, I designed an Art Journal page, along with a variety of textured and colorful tags, Featuring Rita Barakat Designs Mystical Creatures Die Cuts, and Ken Oliver Colorburst Fresh Florals Collection.


The art journal I am using is an expired planner book, that features calendar grid pages. For this art entry, I used Heavy White Gesso to cover the calendar, only leaving certain design elements exposed.


While waiting for the gesso to dry, I used some Plaid Extreme Glitter paint, to add some sparkle to the die cut images.


I then "practiced" techniques using the Fresh Floral Colorburst's, using heavy cardstock tags, and a variety of mediums including gesso, texture paste & Tim Holtz Distress Resist Spray, along with a variety of stamps, ink & Rita Barakat's Magical Mysteries Embossing Powder in Midnight Magic.

Technique 1: Gesso, Punchinella, ColorBurst & water spritz.


Technique 2: Distress Resist Spray, Stencil, Light Colorburst followed through with watercolor brush & light water.


Technique 3: Stamp, Embossing Ink & Rita Barakat Magical Mysteries Embossing Powder.
I then followed with light tap of ColorBurst and water spritz.

So in playing with different techniques, to create the art journal layout, I used a mix of them all, lol.

I just could not decide which I liked the most.

As you see by the background in this photo, all techniques worked together
to create depth, texture and amazing color fluidity!


To add more interest to the design, I used a variety of stamps along with archival ink.


Final touch, was adding the FABULOUS die cuts, adding dimension to each by shadowing around each, using a graphite pencil and blending with water and a brush.


Perfect Color, Texture, with Whimsical Inspiration, in an art journaling page & tags to be used in future projects too!


Thank you so much for joining us in this exciting collaboration & blog hop!

For the Rita Barakat Design products used in this project, please visit Rita's Etsy store at:


Ken Oliver Colorburst can be purchased at a variety of online stores such as Blitsy, Scrapbook.com, Dick Blick and host of other online resources.

For even more inspiration, be sure to follow Rita Barakat on her blog, on Facebook at Rita Barakat 1 for Mixed Media Mondays LIVE, and in the Facebook group Rise & Shine With Rita Barakat.


And if you are not already a subscriber, be sure to subscribe to this blog and the others featured in todays blog hop:

Rita Barakat:

Betz Golden:

Yolie Burke:


Again, thanks for visiting today!

See you again soon!

Until then......
Stay Crafty Cool!


Monday, May 6, 2019

Colorful & Magical Sentiment Canvas

Hello Creatives!
Welcome to INSPIRE!

Today I am sharing with you my first Rita Barakat Designs
project for the month of May, using one of her Art Foamie Stamps & 
a delightful die cut from Rita's Magical Creatures Collection.


My base is a 5x5 pre-gessoed canvas board. 
I chose a variety of gorgeous bluish paints & mediums from Plaid,
as well as a selection of Distress Oxide inks from Tim Holtz, to color the canvas with.


But first, I used Rita's Heart Wing Foamie Stamp along with Tim Holtz Resist Spray, applied directly to the surface of the stamp using a foam "brush".
I then placed the wing image over the unpainted canvas surface, 
and dried using my heat tool.

Then I began layering the colors to the canvas, first using Plaid Watercolor Paint, heavily watered down, and applied in layers over the canvas.

As I was waiting for the paint to set, I began working on the wings to be attached to the die cut.

I used a small sheet of acetate, stamped the Heart Wing image using a very light blue ink archival ink. Once the ink had dried, I cut the wing design from the sheet, and began layering color & dimension to the wings, using the Heart Wing Stamp with each layer.


To add definition to the wing design, I used Distress Ink in Chipped Sapphire, applied to the Heart Wing Stamp, and finished with a layer of Plaid Glitterific. 

I also added a layer of Plaid Extreme Glitter Medium to the die cut image, because as we know, EVERY  Magical Creature should have some sparkle!


To complete the  
coloring of the canvas, I applied a couple of layers of Distress Oxide Ink, applied with a blending tool, and to bring out the "resist" wing design.


I used a double sided foam square along with Beacon 527 Adhesive to add the wings to the die cut, and the die cut to the canvas.


And every Magical Creature should bare an inspiring sentiment, so, I used letter stamps along with archival ink, and applied the quote 
"DON'T STOP BELIEVING"
directly to the canvas.

Finishing touches were adding some blue Seam Binding and some dangle lace trim I had pre-colored with ink, so that it can be a delightful wall hanging to inspire!


For the Rita Barakat products I used in this project,
please visit her Etsy store at:


Be sure that you are following Rita Barakat by subscribing to her blog, to stay up to date with new product releases, and FABULOUS project inspiration!

You can also find Rita Barakat on Instagram and on Facebook, and don't forget to join the "Rise & Shine With Rita Barakat" on Facebook where you will find a host of inspiration and ideas on a daily basis.


On Mondays, join Rita on her Facebook page for Mixed Media Mondays, as she shares great inspiration for your next project!


Be sure to check back tomorrow here on INSPIRE, as the Rita Barakat/Ken Oliver Colorburst collaboration blog hop will be in full swing!

Stop in, follow the links that will be provided, and check out all the inspiration created by the uber talented Rita Barakat Designs DT, as they share how they used the Ken Oliver ColorBurst products to create their art!


Hope to see you tomorrow!!!!

Leave some love, please comment and let me know what you think about this fun project!

Until next time.......


Monday, April 15, 2019

Fun, Bright & Colorful Goody Gumdrop Card How To


Hello Creatives!
Welcome to INSPIRE!

Today I want to share with you
a fun and colorful card I made recently, using 
the gumdrop stamp from
the FABULOUS 
Rita Barakat's Lollipop Art Foamie Collection Stamps.


I also used a variety of Faber-Castell Gelato's and acrylic paint from PLAID.

This card was very simple to make, took minimal time.
My card base is a 60lb heavyweight white cardstock, cut and folded into a 5x7 card size.

I also used the same card stock to stamp the gumdrops on, using the shades of Perfect Purple, Lemon Yellow & Glazed Carrots from PLAID's Folk Art line of acrylic paints.


(I have pictured Watercolor paint from Plaid, but actually went with a deeper shade of purple, from the acrylic line)

I first stamped directly on the card front, and also on an additional piece of card stock, so I could make a layered design with the gumdrop stamps.

Once the paint had dried, I used Faber-Castell Gelato's to enhance the already brightly colored gumdrops.
The shades used:
Orange Soda
Limoncello
Metallic Grape 


Using double sided foam tape,I applied the additional stamped gumdrops, on top of the gumdrops directly stamped on the card front.


I wanted a bit more pizzaz, so I added colorful sequins, randomly place over the card front, using the Embellie Gellie pick up tool from ScraPerfect.


I just so happened to haven my craft stash, candy themed stickers, so I added "candy stripes" to the bottom of the card with a glittered sentiment sticker,"SWEET for you".


And there you have it! A fun card that could brighten anyone's day!


To purchase the Art Foamie Stamps I used in making this card, please visit Rita Barakat's Etsy store at this link:


To stay current on Rita Barakat's new product releases, and for AMAZING inspiration, please subscribe to her blog
following her blog link here:


For Faber-Castell Gelato's visit your local craft retailer or visit Faber-Castell online.

For GORGEOUS acrylic painting and more, visit PLAID online, or pick up at your local craft store.


Thanks so much for visiting INSPIRE today!
If you have not already done so, please subscribe to this blog!

Until next time......

Be Crafty!


Friday, April 12, 2019

Beautiful Watercolor Floral Paper Clips Using Best Glue Ever

Hey Y'all!
I wanted to invite you to stop over
on the ScraPerfect blog, and checkout 
the details on my latest design team project
using Best Glue Ever & No-Clog Writing Cap!

Just follow the link below the pic!


Leave a comment, and subscribe to the 
ScraPerfect blog to stay updated on products, and new creative posts for fresh inspiration!

Thanks for stopping by!

See you next time!

Stay crafty!!!!!

Wednesday, April 10, 2019

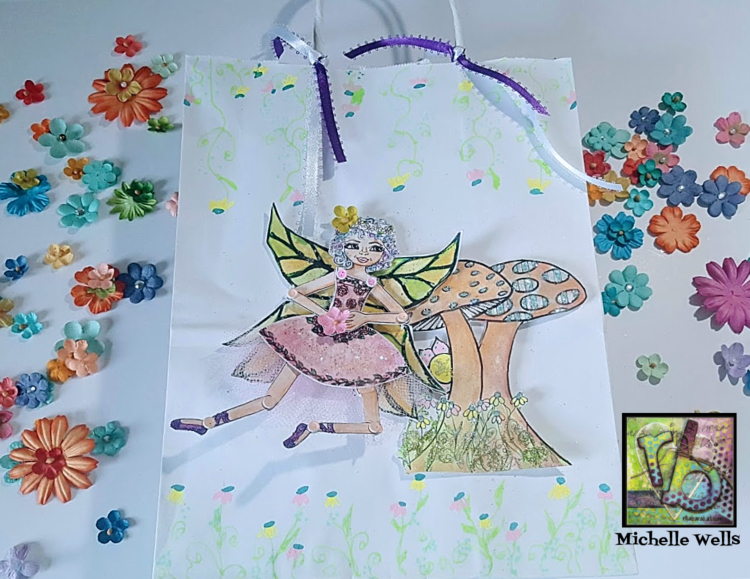
How To Create a Fun Gift Bag With Magical Theatre

Hello Creatives!
Welcome to INSPIRE!

Have you ever found yourself in pinch to have nicely decorated gift bags on hand?

Today I want to share how I turned a simple, logo'd bag, into a a whimsical, glittery & colorful gift bag.


And using a 
pre-colored fairy paper doll, and coloring mushroom images from Rita Barakat's Magical Theatre Book,
made this a simple project to do.


Additional supplies and products used in the making of this gift bag include:

Marvy Bistro Chalk Markers
Faber-Castell Gelato's
PLAID Extreme Glitter & Glitterific.
ScraPerfect Best Glue Ever

Doublesided Foam Tape
Miniature Brads
Scrap Tulle
Variety of Color Paint Markers
Metallic & Glitter Gel Pens

To begin, I chose an adorable fairy from the "FAIRIES" section, along with her pre-colored clothing, and fussy cut the selections.

Using mini brads, that I had colored to match her skin tone, and her dress, I used a paper piercing tool, and added the brads to assemble the paper doll.


Once assembled, I colored her hair with glitter, applied with Best Glue Ever, and also added glitter to the ruffles on her dress in the same manner.


To add glitz to her wings before adding them to her body, I used Plaid Extreme Glitter in Green, and Extreme Glitter to her ballet type shoes in Fuchsia.


I also added some scrap pink tulle to the back side of her skirt for a little more frill.

For the mushrooms, I used gelato's to color, and shade. I then added glitter and metallic accents for a bit of magical flair.


The Marvy Bistro ChalkMarkers work amazingly on chalk board surfaces, but I wanted to see what it could do for this whimsical design.

I drew a floral design to sort of match those which I had fussy cut with the mushroom image.


The results? AMAZING!
They are bright, colorful and add a sort of fun to this bag.


Finally, I added the images to the center of the bag, using double sided foam tape.
I also added satin ribbon to the handles.


Bright. Whimsical. Magical!

All made possible by the 
Magical Theatre Book.

Purchase your copy of Magical Theatre today!


Be sure to subscribe to the Rita Barakat blog, to stay up to date with new product releases, and for creative inspiration!


Thanks so much for visiting today.
Hope to see you again soon!

Oh, and if you have not yet subscribed to the INSPIRE blog,
I would LOVE it if you did so!
Thank You!

Until next time......
Be Crafty!