Friday, August 23, 2019

A Beautiful Floral Fairy Encouragement Card

Hello Creative's!
Welcome to INSPIRE!

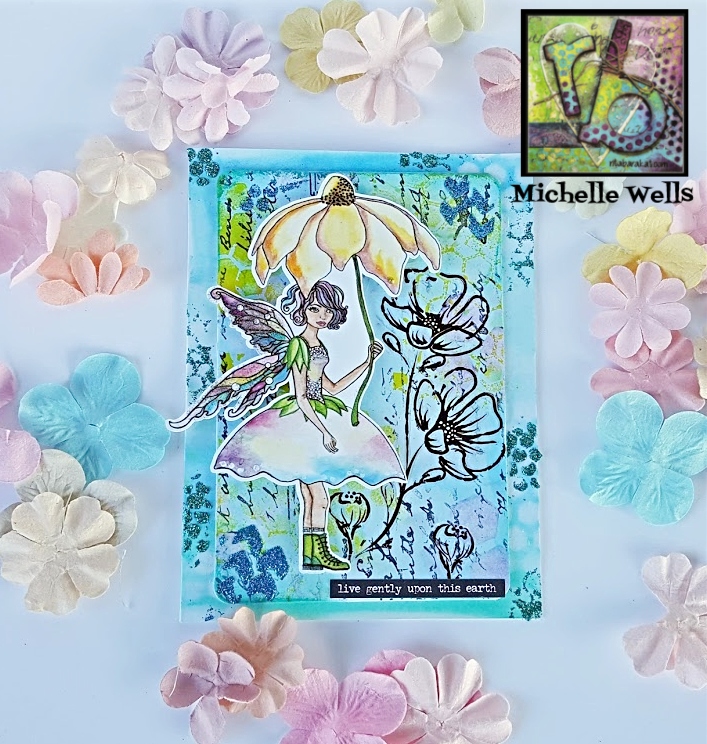
I wanted to share my latest DT project for Rita Barakat Designs with you today.
A beautiful card of encouragement.


I was looking to make an inspirational/encouragement card, and I wanted it to evoke peace and gentleness.

And what is more gentle than the thought of a fairies wings? And what joy a fairy can bring.

That is the inspiration behind today's project.

I chose one of my favorite fairies from Rita's "Veil of the Fairies" collection.

For the gentle coloring of the card base and layering element, I used a variety of blue/green shades from Faber-Castell Gelato's, as well as a mixed media card, and delicate floral rub-ons from a FC Mixed Media kit.

I first applied the gelato's using an ombre' effect, from light to dark.

I lightly spritzed with water, and blended using my finger.


And of course there is GLITTER! For a shimmering textural element, I also used Aladine Diamonds Glitter Paint along with the Geometric Stencil and I also used Aladine Pigment Ink.


As with the textural elements and the fairy, I wanted a simple yet kind sentiment, so I chose one of Tim Holtz Idea-ology Small Talk Stickers.


This was such an easy project to do, and I just love the delicate theme of it all.


For the Rita Barakat Die Cut collection used in this project, and many, many other great collections, visit her online store at:
https://www.etsy.com/shop/RitaBarakat

For more Rita Barakat inspiration visit her blog at:
https://ritabarakat.com/

Faber-Castell products can be found at many big box stores, as well as their online store.
https://www.fabercastell.com/

Visit Aladine at:
https://www.aladine.com/en


Thanks so much for visiting today!
I hope you will visit again soon!

Until next time.......

Live Inspired!

Monday, August 12, 2019

Dwell In Possibility-Beautiful Mermaid Wall Art

Hello Creative Friends!
Welcome to INSPIRE!

Today I want to share with you, my recent dt project for Rita Barakat Designs. 

A beautiful inspiring wall hanging.


Spotlight product feature for this project is her fun and whimsical Art Foamies Stamps in the Mermaid on the Beach & Flower Swirl Designs.

The details on these stamps are PHENOMENAL!

They can be applied using paint or ink, and can take your creative imagination in any direction.

My inspiration, was to up-cycle a scrap piece of wood, a leftover from one of my hubbies projects.

Because this wood is of the laminated variety, so the first step was to add "tooth" in order for the paints and inks to adhere better.

So, I used a medium grit sanding block, and lightly gleaned the surface of the wood. I then used a damp cloth, and wiped it clean.

For added texture, I coated the wood with a light application of clear gesso.

Once the gesso had set, I wanted to use an ombre' effect in the painting, so I chose a variety of bluish turquoise acrylic paints by PLAID.


To give the effect of depth, I added the darkest shade of paint for the bottom, and gradually lightened the shades moving to the top of the wood.

And with each application of color, I blended it slightly with the last color.

I JUST LOVE THE WAY THIS TURNED OUT!

Now for the details.

Using the Mermaid Art Foamie Stamp, I used 
Staz-On Ink, in Jet Black, to apply the image to the now paint dried wood.


I then colored the mermaid in, using additional PLAID acrylic paints, and using PLAID Glitterific and Extreme Glitter, on the mermaid fins to make them sparkle.


For the Flower Swirl Art Foamie Stamp, I applied two different color of green acrylic paint, layering each individually, and allowing to dry in between applications.

Using a Faber Castell Pitt Artist Pen Big Brush in White, I added accents to the flowers and to the mermaid.

I also used Dew Drops from The Robin's Nest, applied using the Embellie Gellie from ScraPerfect and glue, for a dimensional bubble effect.


For finishing touches, I added braided rope around the wood board, using Beacon Multi Grip Glue, seashell embellishments, and Texture Sand.


And last, I added a Tim Holtz Ideaology Quote Chip, "Dwell In Possibility".

So, just like that, I turned a plain, scrap piece of wood, into a beautiful art piece, with a reminder that what ever the dream, anything is possible.

For the Rita Barakat Art Foamies please visit her 
Etsy Store at:


Be sure to join the 
"Rise & Shine With Rita Barakat" Facebook Group,
for daily inspiration, as well as the Rita Barakat Blog.


And for an extra dose of creative fun, be sure to tune in every Monday evening, for 
Mixed Media Monday Live on Rita Barakat1.


If you are not already a subscriber to my blog, I invite you to do so.
I am in the process of "amping up" the creative processes in blogging more, and sharing new creativity.

You can also find me on YouTube at:

Thanks so much for visiting today!

See you again soon!


Tuesday, August 6, 2019

From Drab To Fab: How To Make An Artsy Pillow Cover Plus A Blog Hop

Hello Creatives!
Welcome to INSPIRE.

Today do I have a fun project share for you, 
PLUS links to an FAB Blog Hop collab with 
Rita Barakat Designs & Aladine Ink.

My project was a beyond anything I had made before, and I have to say, I just love how it turned out!

A colorful, decorative inspiration pillow cover, perfect any creative space!


For my project I used the following supplies:

Rita Barakat Designs:
Art Face Stencil


Aladine Ink:
Diamond Glitter Paint
Izink Dye Ink Pads
Izink Dye Ink
Izink Dye Spray
3d Izink Paste
Trio Geometric Stencil


Addtional Supplies:
Beacon Mixed Media Glue
Paper Flowers
Flatback Rhinestones
Metallic Thread
Acrylic Paint


If you have never worked with Aladine products, I encourage you to give them a try. 

The colors are rich & super concentrated, and the texture and glitter products, are just.......AMAZING!

So, using a blank canvas round pillow cover (I had purchased some time ago), my project began. 

I first added a variety of color and finish using the Izink Dye Spray, being careful to not overlay the colors too much, and letting dry between each spray of color.

I then added encouraging words, using a stamp from my stash and permanent black ink, randomly over the surface of the pillow.

Using the GORGEOUS Diamond Glitter Paint and the Trio Geometric Stencil as well as a couple of different stencils from my stash, I began adding texture, and glitz to the pillow.

I also used a distressed floral motif stencil, along with the 3d Texture Paste, which has a beautiful pearlized sheen, and such a creamy texture, applied with a spatula.


Once I had layered the color and texture on the pillow cover, I set it aside to set and dry.

Now for the the face element.

I am absolutely in love with the Art Face Stencils by Rita Barakat. Even if you can not draw faces, theses stencils make it so easy to draw and create art.


I used a 12x12 canvas sheet to illustrate the face.
I first traced the stencil, using a #2 pencil. 

Next, I used a flesh-tone acrylic paint, and painted the face. 


Once the paint had dried, I then reset the stencil, and traced using a black Sharpie, Fine Point marker, to retrace the face design, making sure that the intricate details would be visible with out the stencil.

For the hair, I used the Izink Dye Ink, applying each color with a paint brush, because a girl has to have colorful hair right?


Once the face and hair coloring had dried completely, I then finished the face using additonal acrylic paint and the Izink Dye Ink, to color her lips and add eyeshadow.

I also fussy cut the design from the canvas sheet, and frayed the edges before adhering it to the pillow cover using Beacon Mixed Media Glue.


For finishing touches, I added some soft paper flowers with rhinestone centers, as well as some metallic silver thread, for an added pop of texture.


And there you have it, a fun, inspiring decorative pillow, to place in a chair in a creative space!


Now, for more inspiration created by the talented 
Rita Barakat Design Team!


Check out ALL the amazing projects, leave a comment on each designers blog. 

If you are not already a subscriber, subscribe to each designers blog, to receive even more inspiration.

Make certain, that you visit Rita Barakat's blog,
there is always something "extra" special there!

For even more inspiration, be sure to join the 
"Rise & Shine With Rita Barakat" Facebook group.

And tune in every Monday evening on 
Rita Barakat1 Facebook page, for 
"Mixed Media Monday" LIVE!

Thanks so much for your visit today!

Until next time.....
Live Creatively!