Tuesday, October 8, 2019

Fun & Fabulous Blog Hop & A Chance To Win!


 Hello Friends!
Welcome To The INSPIRE Blog.

Today I want to share with you something really fun. Today kicks off an exciting BLOG HOP, featuring a collaboration with the Rita Barakat Design Team 
& PLAID Crafts.


  And there is something extra exciting with this hop. 
Your chance to win a FABULOUS PRIZE PACK!
All you have to do is follow the links to each designers project (links listed below) AND leave a comment with each designers project post, and subscribe if you are not already a subscriber.

Now on to my project! 

Have you had a chance to see the craft supplies now being offered at stores like the Dollar Tree & Dollar General? I recently had such opportunity and OH MY!

I found these tin wall decor blanks, for less than $3, and immediately my project came into view. These metal blanks are absolutely PERFECT to use with the 
PLAID FolkArt Painted Finishes products.


First thing I did, was use a damp paper towel to wipe over the surface of the blank and dried. I also added a thin layer of clear gesso to the surface and allowed it to dry.

Once it had dried, I applied a thin layer of FolkArt Titanium White, and let dry. I then used PLAID Base Coating Brushes, to begin to apply the Rust & Moss Painted Finishes, by dry brushing the layers on. I used the non textured of each of these sets for coloring only.


I used a sentiment I found online, printed, and fussy cut the image, and applied it to the dried "rust" finish, using Mod Podge Matte.


 I also used light grit sandpaper & Distress Ink to the edge of the image to give a defined aged look.


The embellishments I chose for this project, was from my stash, and made of polymer clay, using a Mod Podge Melt Mold to form.

To give a completely rustic look to these embellishments I applied Painted Finishes layering each individual product in both parts to the surface, to color and texture.


I glued each embellishment into place using 
Beacon Adhesives 527 Glue.


For the final touch, I added the western style boots from Rita's Wild & Free Die Cut Collection, using Mod Podge Matte.

And as simple as that, I have an adorable piece of decor that can hang on a wall, or a door, or even used to sit on a shelf.


And no-one would guess that it all started with a dollar store item.

NOW here are the links to visit the ENTIRE design team presenting their incredible and creative projects for the Rita Barakat & PLAID Crafts Blog Hop.

MAKE SURE YOU VISIT RITA'S BLOG FOR FULL DETAILS OF THE PRIZE!!!!

Rita Barakat - https://ritabarakat.com/?p=5789


Yolie - http://www.justyolie.com/2019/10/rita-barakat-plaid-crafts-blog-hop.html

Martha Lucia - https://wp.me/p5TnaH-7bn


And here is the link to Rita's Etsy Store, so you can purchase the die cut collection used in this project and so much more for your mixed media crafting needs!


And be sure to to tune in every Monday evening on Facebook at RitaBarakat1 for Mixed Media Monday with Rita.
Join the fun conversation and learn something along the way too!


And don't forget to join the 
RISE & SHINE WITH RITA BARAKAT Facebook Group
for daily inspiration!


Thanks so much for your visit today!

Hope to see you again soon!

Until Next Time.......

Live Creatively Inspired!


Sunday, October 6, 2019

Vintage Inspired Gentleman's Journal, A Great Gift

Welcome to INSPIRE!

Hello there friends!
I hope that y'all are enjoying fall 
where ever you are!

I have been fall inspired for weeks, and 
have doing a lot a fall crafts & DIY's around the home.

Today however, I wanted to share with you the link to my YouTube Channel, 
and a video share that isn't exactly fall related.

My friend Kim Lippincott over at the 
Vintage Rose Creations Facebook store, recently sent me an AMAZING pack of products and items.

So, for my first designer project with these goodies, I created my very first Gentleman's Journal.


Definitely took me back to my youth, when my dad would smoke a cherry-vanilla cigar......yes we all know smoking is BAD, but there is honestly just something about the smell of a cigar or pipe, that takes me back to my childhood every time. 

AAAANY how.......
Here is the video and link to my YouTube channel, I certainly hope you will visit.


And please subscribe, I am finally getting the hang of youtubing, and I would love to share it with y'all!

Please visit Vintage Rose Creations on Facebook, for unique vintage and vintage inspired fabric, ephemera, paper products, books and so much more!


Join the fun at Kim's Vintage Rose & Crafty Friends on Facebook, where you can share with other your creative makes, and make friendships too!!!


Thanks so much for visiting today!

Until next time.....
Live Life Inspired!

Monday, September 30, 2019

A Beautifully Broken Life Inspired Art Canvas

Hello Creative Friends!
Welcome to INSPIRE!

Today I want to share with you
my latest DT project for Rita Barakat Designs.
A colorful canvas, inspired by one of my favorite songs, by a favorite recording Plumb.


The song "Beautifully Broken" instills hope in knowing that 
no matter how beat up, broken we become in life, God see's as BEAUTIFUL.

Once I had used remnants of designed paper using 
Plaid Mod Podge Matte, I applied a thin layer of white gesso over the surface.


I wanted to be certain I got the exact lines of the stamp face, so I first stamped on white paper, cut out the design, and traced around it directly on the canvas.


Once I had traced the design, I used my finger to add 
flesh-tone acrylic paint to the face and neck.


I then used archival ink in black to stamp the face unto the painted face after it had dried.


To color the face, I used Faber-Castell PITT Brush Markers.

Rita's "Reflections" Technique Junkie Stamp was absolutely perfect to catch a likeness of the recording artist.
However, I decided to add a wild mane of hair, but I did keep to the original face design of the stamp.


I also used the same stamping ink, and a floral silhouette design stamp from my stash, across the bottom of edge, in keeping with the floral paper design in the background. 

Followed by adding "drips" of color using 
Aladine Izink inks, for pops of vivid color.


I used  butterfly and honeycomb stencils, 
using Aladine 3D Texture Paste in Pearl, applied with a spatula, to add a bit of texture throughout the design.

To finish, I stamped butterfly images, and stamped the title
"BEAUTIFULLY BROKEN" and added to the design using Beacon Mixed Media Glue.

And there you have it, a simply made canvas, as a gentle reminder that regardless of who we are, where we have been, and the scars we may bare, we are still beautiful.


For Rita Barakat Stamps, Die Cuts & more, 
visit her Etsy store at:


Please join the Facebook Group 
"Rise & Shine with Rita Barakat"
to find daily inspiration, 
and share your makes too.


And don't forget, to tune in Monday evenings, to join in the fun as Rita shares techniques and ideas in creativity, on Facebook LIVE, Rita Barakat1!


Follow Rita's blog to stay up to date with product anouncements, giveaways & more!


Thanks so much for visiting today!

I hope you will visit again soon!

Until next time.....
Live Life Inspired!

Monday, September 16, 2019

Colorful Mixed Media Card With Positive Sentiment

Hello Everyone!
Welcome to INSPIRE!

Sometimes we need a card and need it quick, with no time to run out a buy one.

If you have the right supplies, you can make one that easy to put together, but has LOADS of personality.

That is what I have done this week for my DT project for Rita Barakat Designs.


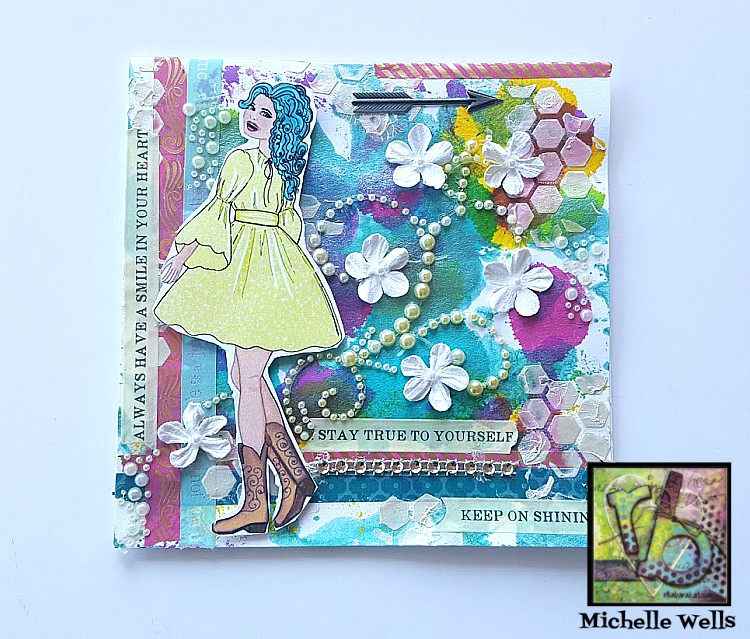
I used a 6x6 Mixed Media Card, as I wanted to add color using the Aladine Izink Inks & 3D Izink Texture Paste.

And the perfect touch, one of Rita's "Wild & Free" Die Cuts, which just happens to be my FAVE collection!

I randomly dropped the inks separately unto an acrylic sheet, then applied it face down to the card, to achieved random patterns. Allowing to dry between each color.


I applied beautiful washi tape with sentiments and designs, over the surface of the card.


I also applied with a spatula, the 3D Izink Texture paste using a honeycomb stencil, randomly over the card.


Once everything had set, I added the die cat using Scrapbook Adhesives Foam Squares, and finished with self adhesive pearl stencils, mini flowers, and metal embellishment. 

Yes it was that easy!
And what a cheerful and encouraging card to share!


For the "Wild & Free" Die Cut Collection, visit Rita's Etsy store at:

And be sure to follow Rita & her team, as well as find fresh inspiratoin daily through Facebook at 
Rise & Shine with Rita Barakat.


Join in Monday evenings for Mixed Media Mondays over at Rita Barakat1 on Facebook:


And don't forget to subscribe to Rita's blog at:


Thanks so much for visiting today!

Hope to see you again soon!

Until next time.......
Live Life Inspired!💖

Tuesday, September 10, 2019

Read A Good Book, Journal Your Great Tale, Join The Hop!

Hello Creatives!
Welcome to INSPIRE!

Today I wanted to share with you, links and 
my project for the 
Rita Barakat/Finders Keepers/Scrapbook Adhesives
Blog Hop.


What a fun project this was to create.
I LOVE a good book.
And to inspire a young mind to explore a good book, is one of my favorite things to do.

Reading a book, letting imagination soar, was the inspiration for my project.

And the Libris Schmibris Paper collection along with the Jots & Dots Notebook & Rita Barakat's Fairytale Die Cut Collection, well, my imagination soared!


After measuring my paper selections to fit the journal, I began putting it all in place, with the AMAZING products from Scrapbook Adhesives.


I added elements from the paper and coordinating sticker collection through out the journal, including "tabs" that could certainly fit any book details for a young student.

For the outside cover, I used the "A Likely Story" Paper, because it featured imagery of my ALL TIME favorite book, Alice in Wonderland, and I also chose the Hatter & Alice from Rita's Fairytale Die Cuts.


For embellishing, I used Scrapbook Adhesives Foam Sheet, with a flower shaped punch, and added their foil transfer. I loved this technique so much, I used a hole punch in the same manner, and added "foil" dots on the cover & throughout the book.


The inside cover features a design to add the name of the user, and I added pockets through out to use library card elements from the Libris Paper Collection.


This was by far the easiest journal I have put together, and using Scrapbook Adhesive products made it so.

And in addition to the fabulous Libris Collection Paper and Rita Barakat's Fairytale Die Cut Collection.....PERFECTION!


NOW it is time to join the hop!

Be sure to follow each link provided here, leave a comment on each designers blog post, follow their blog, (beginning here with my blog) and MAKE SURE you visit Rita's blog, for details how you could win a prize!

Rita Barakat - https://ritabarakat.com/?p=5618


Martha Lucia Gomez - https://wp.me/p5TnaH-733

Join Rita Barakat on Facebook for Mixed Media Monday LIVE, and the Rise & Shine w/ Rita Barakat Group, to stay inspired and meet other creatives like you!

Thanks so much for visiting today!
Hope to see you again soon!
Until then....
Live INSPIRED!