Showing posts with label Wild & Free. Show all posts

Thursday, October 17, 2019

The Simple Life Harvest Mixed Media Canvas

Hello Friends!
Welcome to INSPIRE.

Here in the Ohio valley we still have hints of summer lingering in the air, and the calendar officially states it is fall.

I am so ready for fall, and have started by adding hints of fall in my home decor. 

 I LOVE incorporating pumpkins into my fall decor scheme, real, fake and even painted. 

And where does it say that all pumpkins have to be spooky to decorate with?

I have learned to paint pumpkins on canvas, and there is no stopping me now!

These are the inspirations found in my 
Rita Barakat Design Team project this week.


And along with selections of Rita Barakat's Wild & Free and Be True Die Cut Collections,the perfect fall decor piece has come to to life.

I began my project with a 5x5 canvas board and 
PLAID FolkArt Paints.

Once I had figured out and sketched my design unto the canvas board, I began painting each element including the background.

From Rita's die cut collections, I chose the western pair of boots, and floral elements from one of the die cuts featured in the Be True Collection.


For this project, I did alter the die cut selections used as I wanted  fall inspired colors, and the floral of the die cuts were perfect, and I was going to be covering the pink rose on the boot die cuts anyways, so I clipped it off.


Once the paint had
completely dried,
 I glued the die cut elements to the canvas using Beacon Mixed Media Glue. 

I detailed my pumpkins and painted designs using watercolor pencils, and distressed the die cuts used a bit with my distressing tool.

I then glued the die cut elements to the canvas using Beacon Mixed Media Glue. 


Using archival ink and stamps from my stash,
I stamped the phrase
"Live A Simple Life" on to the canvas.

I also used Beacon 527 Glue to adhere the canvas unto a wood block measuring 6x6, to use to sit on a shelf.

Now I have the perfect tabletop or shelf decor to add to my fall decorating.


For the die cut collections used in this project, please visit 
Rita Barakat's Etsy store.


Join Rita and friends every Monday night on RitaBarakat1 on Facebook for Mixed Media Monday.


For even more fun and inspiration, join the 
"Rise & Shine With Rita Barakat" Facebook group today!


And, follow Rita on her blog for special announcements, contests and more!


Thanks so much for visiting!

Be sure to subscribe to this blog, and to my 
YouTube Channel INSPIRE at:

Until Next Time.....
Live Life Inspired!


Tuesday, October 8, 2019

Fun & Fabulous Blog Hop & A Chance To Win!


 Hello Friends!
Welcome To The INSPIRE Blog.

Today I want to share with you something really fun. Today kicks off an exciting BLOG HOP, featuring a collaboration with the Rita Barakat Design Team 
& PLAID Crafts.


  And there is something extra exciting with this hop. 
Your chance to win a FABULOUS PRIZE PACK!
All you have to do is follow the links to each designers project (links listed below) AND leave a comment with each designers project post, and subscribe if you are not already a subscriber.

Now on to my project! 

Have you had a chance to see the craft supplies now being offered at stores like the Dollar Tree & Dollar General? I recently had such opportunity and OH MY!

I found these tin wall decor blanks, for less than $3, and immediately my project came into view. These metal blanks are absolutely PERFECT to use with the 
PLAID FolkArt Painted Finishes products.


First thing I did, was use a damp paper towel to wipe over the surface of the blank and dried. I also added a thin layer of clear gesso to the surface and allowed it to dry.

Once it had dried, I applied a thin layer of FolkArt Titanium White, and let dry. I then used PLAID Base Coating Brushes, to begin to apply the Rust & Moss Painted Finishes, by dry brushing the layers on. I used the non textured of each of these sets for coloring only.


I used a sentiment I found online, printed, and fussy cut the image, and applied it to the dried "rust" finish, using Mod Podge Matte.


 I also used light grit sandpaper & Distress Ink to the edge of the image to give a defined aged look.


The embellishments I chose for this project, was from my stash, and made of polymer clay, using a Mod Podge Melt Mold to form.

To give a completely rustic look to these embellishments I applied Painted Finishes layering each individual product in both parts to the surface, to color and texture.


I glued each embellishment into place using 
Beacon Adhesives 527 Glue.


For the final touch, I added the western style boots from Rita's Wild & Free Die Cut Collection, using Mod Podge Matte.

And as simple as that, I have an adorable piece of decor that can hang on a wall, or a door, or even used to sit on a shelf.


And no-one would guess that it all started with a dollar store item.

NOW here are the links to visit the ENTIRE design team presenting their incredible and creative projects for the Rita Barakat & PLAID Crafts Blog Hop.

MAKE SURE YOU VISIT RITA'S BLOG FOR FULL DETAILS OF THE PRIZE!!!!

Rita Barakat - https://ritabarakat.com/?p=5789


Yolie - http://www.justyolie.com/2019/10/rita-barakat-plaid-crafts-blog-hop.html

Martha Lucia - https://wp.me/p5TnaH-7bn


And here is the link to Rita's Etsy Store, so you can purchase the die cut collection used in this project and so much more for your mixed media crafting needs!


And be sure to to tune in every Monday evening on Facebook at RitaBarakat1 for Mixed Media Monday with Rita.
Join the fun conversation and learn something along the way too!


And don't forget to join the 
RISE & SHINE WITH RITA BARAKAT Facebook Group
for daily inspiration!


Thanks so much for your visit today!

Hope to see you again soon!

Until Next Time.......

Live Creatively Inspired!


Monday, September 16, 2019

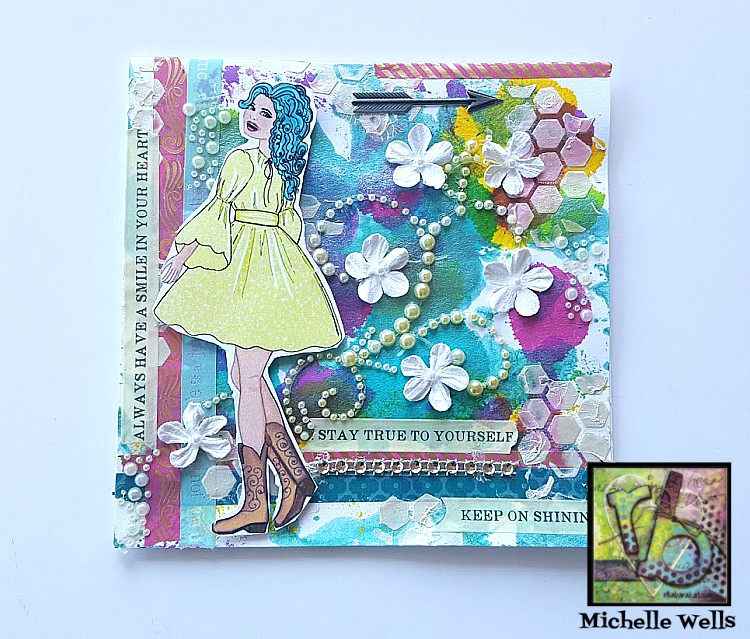
Colorful Mixed Media Card With Positive Sentiment

Hello Everyone!
Welcome to INSPIRE!

Sometimes we need a card and need it quick, with no time to run out a buy one.

If you have the right supplies, you can make one that easy to put together, but has LOADS of personality.

That is what I have done this week for my DT project for Rita Barakat Designs.


I used a 6x6 Mixed Media Card, as I wanted to add color using the Aladine Izink Inks & 3D Izink Texture Paste.

And the perfect touch, one of Rita's "Wild & Free" Die Cuts, which just happens to be my FAVE collection!

I randomly dropped the inks separately unto an acrylic sheet, then applied it face down to the card, to achieved random patterns. Allowing to dry between each color.


I applied beautiful washi tape with sentiments and designs, over the surface of the card.


I also applied with a spatula, the 3D Izink Texture paste using a honeycomb stencil, randomly over the card.


Once everything had set, I added the die cat using Scrapbook Adhesives Foam Squares, and finished with self adhesive pearl stencils, mini flowers, and metal embellishment. 

Yes it was that easy!
And what a cheerful and encouraging card to share!


For the "Wild & Free" Die Cut Collection, visit Rita's Etsy store at:

And be sure to follow Rita & her team, as well as find fresh inspiratoin daily through Facebook at 
Rise & Shine with Rita Barakat.


Join in Monday evenings for Mixed Media Mondays over at Rita Barakat1 on Facebook:


And don't forget to subscribe to Rita's blog at:


Thanks so much for visiting today!

Hope to see you again soon!

Until next time.......
Live Life Inspired!💖

Friday, June 21, 2019

The Cowgirl Way Mixed Media Tag How To

Hey There Creatives!
Welcome to INSPIRE.

Today, I am sharing a creative project using a new Die Cut release by Rita Barakat, 
"Wild & Free" Cowgirls.


This is a delightful collection of original artwork by Rita Barakat, that works nicely for any creative project!

For this project, I chose to use a craft paper heavy tag as the background.

I definitely wanted to use denim or denim like colors in this project, after all, she is a cowgirl, so I used Color Box Chalk Ink in Denim, along with edging with Ken Oliver Color Burst in Prussian Blue.

I also used the chalk ink with a texture patterned stencil.


Next, I had previously made a variety of backgrounds with Ken Oliver Color Burst, and chose one I had embossed using Rita Brakat's Magical Mysteries Embossing Powder in Midnight Magic for the background.

At this point, I used a scrap piece of denim fringe, to attach to the bottom of the tag, using Beacon Multi Grip Glue.


I had textured the edges of both the tag and the background to give a distressed edge prior, and used double sided foam squares to adhere the back ground to the tag base.


From this point, it was all a matter of layering and adding elements along with the Cowgirl Die Cut.

The embellishments included metallic embossed stickers by Tim Holtz Ideaology, as well as a sentiment from the Ideaology Small Chat stickers.

I also added scrap lace, a couple of mini doilies, fabric & denim scrap to make a ribbon for the top of the tag, and handmade flowers that matched her dress perfectly!

So easy, with so much country charm!


Feeling inspired?

Then head on over to Rita Barakat's Etsy store and snatch up some of these die cuts for yourself!

For even more inspiration, visit Rita's blog, and sign up for her newsletter, to stay current on product releases, class schedules and more!

Be sure to tune in every Monday evening at RitaBarakat1 on Facebook, for Mixed Media Mondays and join the 
Rise And Shine With Rita Barakat group, for even more inspiration and fun!


Thanks so much for visiting today!

Live creatively inspired!

Michelle