Thursday, March 29, 2018

A Little Shabby Chic Treasure For Pretty Spring Decor

Hello welcome
to INSPIRE.

Each week, among my design team projects
that I am working on, there lies a pile or two
of "intended" personal projects, just waiting to
be created.

With Sunday being Easter, and with much of the NorthEastern portion of the USA (including my little corner of Ohio) having been stuck with winter conditions far longer than wanted, I wanted to do something with "life".

Enter the paper mache' egg.


This idea struck while combing the aisles
of my local Hobby Lobby & Michael stores, in
search of a "fresh" idea.

So with one 50% off Easter sale at one store, and a great deal of various Easter eggs at another, the idea came to life.

For this project I used:
Gel Medium
Printed Tissue Paper
Heavy White Gesso
Metallic Wax & Paint
Glue
Lace Trim
Ribbon
Moss Ribbon
Miniature Flower Bunch
Mini Stones
Prill Sprays
Butterfly Embellishment
Wooden Candle Stick Holder
2.5" Paper Mache' Egg


Tools used:
Scissors
Craft Knife
Beading Awl
Sanding Block

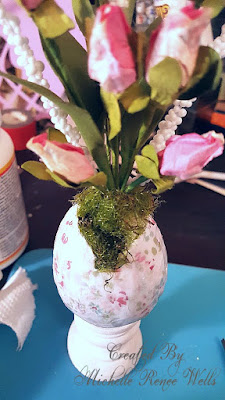
I began by using my craft knife, to cut out a small portion from the top of the egg.


I then used gesso, and covered the entire egg and candle holder, and let dry thoroughly.

With the tissue paper, I ripped out areas that featured a beautiful floral print, and then applied with gel medium to the surface of the egg.

Using the sanding block, I roughed up the surface of the candle just a bit. to give a weathered look. I then followed by applying and rubbing a pewter colored wax, randomly over the surface of the candle holder.
To finish I used a metallic pink paint, lightly applied with my finger, also randomly over the surface.

Once the tissue paper had set, I used the moss ribbon as a filler to the inside of the egg, secured by glue. 


With the beading awl, made a hole within the moss, and then added the floral spray, with glue to the inside center of the egg.


I pulled a few "tendrils" of the moss the exposed edges of the egg hole, and added a pinch of mini stones around the base of the floral spray with glue.

Final embellishment to the floral, was a small clay Butterly, added to the base of the floral spray.

Using a 3 inch section of some scrap lace trim, I glued it to the top of the candle holder.

To finish, I used some vintage pink ribbon, made into a double bow, centered with a small pearl embellishment to finish.

And what a little lovely to sit on a desk or shelf, to remind me of the beauty that is just around the corner with the awakening of Spring.


Thanks so much for visiting today!

Please stop back by again soon!

Until next time.......BE CRAFTY!
Tuesday, March 20, 2018

Memories Of The Past Find New Life

Hey there!
Welcome to INSPIRE.

A couple of weekends ago,
I took the weekend and visited
a local flea market & antique mall, in search of some vintage goodies I could use in
my crafting endeavors.

I walked away with a handful of vintage photos & a silver plated teapot with sugar & creamer vessels too,
all for under $20.
Yep, under $20!


So this past week, I spent time putting together some layouts, featuring a few of the photos along with some of my favorite paper & flowers designs.


Have to say I am quite pleased with how these layouts turned out.

Each has a different style, yet still keeping with a vintage edge. 

Next on my agenda, how to alter the silver tea service set........stay tuned.

Thanks so much for visiting today,
please visit again soon.

Until next time......Be Crafty!

Friday, March 9, 2018

What An Exciting Day! My First CCB Creative Crew Project Post!

Hello there!
Welcome to INSPIRE!

I am so excited to
be sharing with you, 
the link to my first official
Canvas Corp Brand Creative Crew
project post.
A spring inspired clutch purse,
created from a canvas banner.
Yes a banner.

http://blog.canvascorpbrands.com/spring-inspired-canvas-clutch-purse/


For full details on how I made this beauty
 and link to the
 Canvas Corp Brands online shop,
visit The Creative Studio link below the photo,
or visits the links here:


https://shop.canvascorpbrands.com


http://blog.canvascorpbrands.com

This was a such a fun project to do,
I hope you check it out, and find yourself inspired.

Thanks for stopping by!

Until next time.............Be Crafty!

Wednesday, March 7, 2018

Giving An Old Lampshade New Life

Hello there!
Welcome to INSPIRE.

So, technically spring is still days away, but here in the Ohio valley, we have been teased a bit
of that upcoming bliss with warmer 
than average temperatures for this time of year.

So naturally, that has had me in a "re-habbing" mood, especially with my home decor.
For it is the time of year, to shake the winter blahs, and bring new life, into my decor.

My latest obsession in decor has been
Farmhouse/Shabby/French Flea Market designs.
I am also a fan of working with what I have, and just making subtle changes.

A few months ago while perusing a clearance section in the fabric dept. at my local Hobby Lobby, I found a French Script shower curtain, for like $3.

Of course I snatched it up.

The first projects I completed, was recovering my unsightly white linen drum lampshades on my living room lamps.


Having leftover material, I decided to do the same with the old lampshade for this small lamp.


So, I measured, cut, ironed & glued the fabric to the existing lampshade, and added some gorgeous fringe in a coordinating color.

This was a simple & easy project, with lots of decorative punch when finished.

And so lovely in our entryway hallway.


Thanks so much for stopping by today.

Visit again soon, and see what other creative endeavors are a foot!

Until next time.......Be Crafty!