Monday, May 6, 2019

Colorful & Magical Sentiment Canvas

Hello Creatives!
Welcome to INSPIRE!

Today I am sharing with you my first Rita Barakat Designs
project for the month of May, using one of her Art Foamie Stamps & 
a delightful die cut from Rita's Magical Creatures Collection.


My base is a 5x5 pre-gessoed canvas board. 
I chose a variety of gorgeous bluish paints & mediums from Plaid,
as well as a selection of Distress Oxide inks from Tim Holtz, to color the canvas with.


But first, I used Rita's Heart Wing Foamie Stamp along with Tim Holtz Resist Spray, applied directly to the surface of the stamp using a foam "brush".
I then placed the wing image over the unpainted canvas surface, 
and dried using my heat tool.

Then I began layering the colors to the canvas, first using Plaid Watercolor Paint, heavily watered down, and applied in layers over the canvas.

As I was waiting for the paint to set, I began working on the wings to be attached to the die cut.

I used a small sheet of acetate, stamped the Heart Wing image using a very light blue ink archival ink. Once the ink had dried, I cut the wing design from the sheet, and began layering color & dimension to the wings, using the Heart Wing Stamp with each layer.


To add definition to the wing design, I used Distress Ink in Chipped Sapphire, applied to the Heart Wing Stamp, and finished with a layer of Plaid Glitterific. 

I also added a layer of Plaid Extreme Glitter Medium to the die cut image, because as we know, EVERY  Magical Creature should have some sparkle!


To complete the  
coloring of the canvas, I applied a couple of layers of Distress Oxide Ink, applied with a blending tool, and to bring out the "resist" wing design.


I used a double sided foam square along with Beacon 527 Adhesive to add the wings to the die cut, and the die cut to the canvas.


And every Magical Creature should bare an inspiring sentiment, so, I used letter stamps along with archival ink, and applied the quote 
"DON'T STOP BELIEVING"
directly to the canvas.

Finishing touches were adding some blue Seam Binding and some dangle lace trim I had pre-colored with ink, so that it can be a delightful wall hanging to inspire!


For the Rita Barakat products I used in this project,
please visit her Etsy store at:


Be sure that you are following Rita Barakat by subscribing to her blog, to stay up to date with new product releases, and FABULOUS project inspiration!

You can also find Rita Barakat on Instagram and on Facebook, and don't forget to join the "Rise & Shine With Rita Barakat" on Facebook where you will find a host of inspiration and ideas on a daily basis.


On Mondays, join Rita on her Facebook page for Mixed Media Mondays, as she shares great inspiration for your next project!


Be sure to check back tomorrow here on INSPIRE, as the Rita Barakat/Ken Oliver Colorburst collaboration blog hop will be in full swing!

Stop in, follow the links that will be provided, and check out all the inspiration created by the uber talented Rita Barakat Designs DT, as they share how they used the Ken Oliver ColorBurst products to create their art!


Hope to see you tomorrow!!!!

Leave some love, please comment and let me know what you think about this fun project!

Until next time.......


Monday, April 15, 2019

Fun, Bright & Colorful Goody Gumdrop Card How To


Hello Creatives!
Welcome to INSPIRE!

Today I want to share with you
a fun and colorful card I made recently, using 
the gumdrop stamp from
the FABULOUS 
Rita Barakat's Lollipop Art Foamie Collection Stamps.


I also used a variety of Faber-Castell Gelato's and acrylic paint from PLAID.

This card was very simple to make, took minimal time.
My card base is a 60lb heavyweight white cardstock, cut and folded into a 5x7 card size.

I also used the same card stock to stamp the gumdrops on, using the shades of Perfect Purple, Lemon Yellow & Glazed Carrots from PLAID's Folk Art line of acrylic paints.


(I have pictured Watercolor paint from Plaid, but actually went with a deeper shade of purple, from the acrylic line)

I first stamped directly on the card front, and also on an additional piece of card stock, so I could make a layered design with the gumdrop stamps.

Once the paint had dried, I used Faber-Castell Gelato's to enhance the already brightly colored gumdrops.
The shades used:
Orange Soda
Limoncello
Metallic Grape 


Using double sided foam tape,I applied the additional stamped gumdrops, on top of the gumdrops directly stamped on the card front.


I wanted a bit more pizzaz, so I added colorful sequins, randomly place over the card front, using the Embellie Gellie pick up tool from ScraPerfect.


I just so happened to haven my craft stash, candy themed stickers, so I added "candy stripes" to the bottom of the card with a glittered sentiment sticker,"SWEET for you".


And there you have it! A fun card that could brighten anyone's day!


To purchase the Art Foamie Stamps I used in making this card, please visit Rita Barakat's Etsy store at this link:


To stay current on Rita Barakat's new product releases, and for AMAZING inspiration, please subscribe to her blog
following her blog link here:


For Faber-Castell Gelato's visit your local craft retailer or visit Faber-Castell online.

For GORGEOUS acrylic painting and more, visit PLAID online, or pick up at your local craft store.


Thanks so much for visiting INSPIRE today!
If you have not already done so, please subscribe to this blog!

Until next time......

Be Crafty!


Friday, April 12, 2019

Beautiful Watercolor Floral Paper Clips Using Best Glue Ever

Hey Y'all!
I wanted to invite you to stop over
on the ScraPerfect blog, and checkout 
the details on my latest design team project
using Best Glue Ever & No-Clog Writing Cap!

Just follow the link below the pic!


Leave a comment, and subscribe to the 
ScraPerfect blog to stay updated on products, and new creative posts for fresh inspiration!

Thanks for stopping by!

See you next time!

Stay crafty!!!!!

Wednesday, April 10, 2019

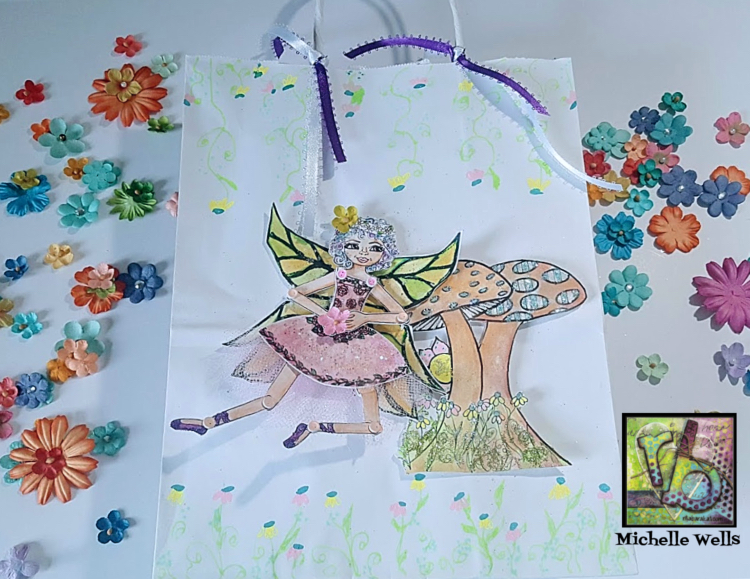
How To Create a Fun Gift Bag With Magical Theatre

Hello Creatives!
Welcome to INSPIRE!

Have you ever found yourself in pinch to have nicely decorated gift bags on hand?

Today I want to share how I turned a simple, logo'd bag, into a a whimsical, glittery & colorful gift bag.


And using a 
pre-colored fairy paper doll, and coloring mushroom images from Rita Barakat's Magical Theatre Book,
made this a simple project to do.


Additional supplies and products used in the making of this gift bag include:

Marvy Bistro Chalk Markers
Faber-Castell Gelato's
PLAID Extreme Glitter & Glitterific.
ScraPerfect Best Glue Ever

Doublesided Foam Tape
Miniature Brads
Scrap Tulle
Variety of Color Paint Markers
Metallic & Glitter Gel Pens

To begin, I chose an adorable fairy from the "FAIRIES" section, along with her pre-colored clothing, and fussy cut the selections.

Using mini brads, that I had colored to match her skin tone, and her dress, I used a paper piercing tool, and added the brads to assemble the paper doll.


Once assembled, I colored her hair with glitter, applied with Best Glue Ever, and also added glitter to the ruffles on her dress in the same manner.


To add glitz to her wings before adding them to her body, I used Plaid Extreme Glitter in Green, and Extreme Glitter to her ballet type shoes in Fuchsia.


I also added some scrap pink tulle to the back side of her skirt for a little more frill.

For the mushrooms, I used gelato's to color, and shade. I then added glitter and metallic accents for a bit of magical flair.


The Marvy Bistro ChalkMarkers work amazingly on chalk board surfaces, but I wanted to see what it could do for this whimsical design.

I drew a floral design to sort of match those which I had fussy cut with the mushroom image.


The results? AMAZING!
They are bright, colorful and add a sort of fun to this bag.


Finally, I added the images to the center of the bag, using double sided foam tape.
I also added satin ribbon to the handles.


Bright. Whimsical. Magical!

All made possible by the 
Magical Theatre Book.

Purchase your copy of Magical Theatre today!


Be sure to subscribe to the Rita Barakat blog, to stay up to date with new product releases, and for creative inspiration!


Thanks so much for visiting today.
Hope to see you again soon!

Oh, and if you have not yet subscribed to the INSPIRE blog,
I would LOVE it if you did so!
Thank You!

Until next time......
Be Crafty!


Tuesday, April 9, 2019

Soft And Cuddly Bunny With Delightful Easter Basket How To

Hello Creatives!
Welcome to INSPIRE!

Today there is something very exciting going on!

It is BLOG HOP day with Rita Barakat Designs!

Today's hop is in collaboration with Clover featuring their AWESOME Felting Tools, and with Kunin Felt.

My design is all about an Easter Bunny!


I have to admit, that this was a first for me. And oh my, do I believe that I have found a new crafting love!

I began by first making the bunny. Using a generous amount of the Natural Wool Roving from Clover, I started shaping the bunny's body using the Clover Felting Needle Tool, along with the small Felting Brush Mat.


I continued to work the wool roving until it was slightly firm, but yet soft. I them used the Pen Style Needle to firm up where I would be adding the legs and also neck, followed by detailing the definition of these areas using the Single Felting Needle Tool.

I followed the same process in forming the bunny head, but using the Pen Style Needle & Single Felting Needle Tool more to shape.

I also used the Single Felting Needle Tool to shape & definite nose using Pink Wool Roving also from Clover, and making definition eye sockets.

For the eyes, I used Tear Drops in black from The Robin's Nest, adhered using Beacon 527 adhesive  I also added ultra fine upper eyelashes using Black Wool Roving and Single Needle Felting Tool.


I wanted firmness at the bottom of the head, so I cut a small circle from the Kunin White Classic Felt and again used the Single Felting Needle Tool to secure it to the bottom of the head.

Every bunny needs a basket, right?

I crafted the adorable basket using a variety of the 
Kunin Felt.

I chose the Smoke Felt for the basket body and handle. For added size, I left the felt "open" ended, and secured it by adding eyelets and silk ribbon to secure the opening.


To make the handle, I used 2 strips of the Smoke Felt, with floral wire between for stability, and glued the two felt pieces together, once again using Beacon 527.

I wanted to add brightness to the basket and a little frill, so  I added some floral lace trim to the inside of the basket, a scalloped piece of White Felt to the bottom as trim.

I also cut out small egg shapes from the Yellow & Brilliant Blue Felt, and added a bit of "glitz" using Rita Barakat's Magical Mysteries Embossing Powders in Kiss of the Fairy & Midnight Magic.


I also added designs to the plastic eggs using these AMAZING embossing powders.


My finishing touches was creating grass blades to add to the inside of the basket, using the Olive Felt, and adding bows made with the Candy Pink Felt and a larger bow in the Brilliant Blue to the handle.


ADORABLE EASTER DECOR COMPLETE!

And all thanks to the premium products of Clover, Kunin & Rita Barakat Designs!

Now, it is time to check out what the other members
of Rita Barakat Designs Design Team has creating with their 
Clover & Kunin products!

Hop on over with these links!


Yolie Burke:


Just follow these links and be inspired!

To purchase Clover Products please visit:


For Kunin Felt visit:


And for FABULOUS creative products
please visit Rita Barakat Designs on Etsy at:


Saturday, April 6, 2019

A Grateful Heart Tag Full Of Color!

Hey y'all!
Wanted to stop by and share 
the link to my latest 
DT project for The Robin's Nest.

A colorful and encouraging sentiment tag
featuring Robin's Nest Dew Drops & Tear Drops
along with Ken Olivers Color Burst, and products 
from ScraPerfect too!


Follow this link to see the full details, 
and how easy this was to create!


Thanks for stopping by!!!!!

Face each day with a grateful heart!