Wednesday, December 28, 2016

A Little Inspiration

Hello Everyone.
It has been a long couple of weeks since I have posted or even created anything.
 
This Christmas, was a bit of a difficult one,
and somehow a very busy one at the same time.
 
And now as we embark upon the New Year,
I find myself like so many others, laying the ground work for "RESOLUTIONS".
 
 As difficult as much of 2016 has been, these last couple of months I have learned to let go of things that I am incapable of changing myself, and pressing past all that has been weighing me down emotionally, mentally & creatively.
So, all in all, I have already began preparations of positive change, going into 2017.
 
A local friend, has decided to do a vision board for the new year.
She has inspired me to do the same.
My hope is that once I establish daily, weekly and monthly goals, that I will be diligent in achieving more success for my life.
One goal, BE CREATIVE EVERYDAY.
That has actually started THIS week.
 
First goal challenge, create cards WITHOUT my dependence of my cutting machine.
Aside from the paper flowers, I did not use my cutting machine in these designs.


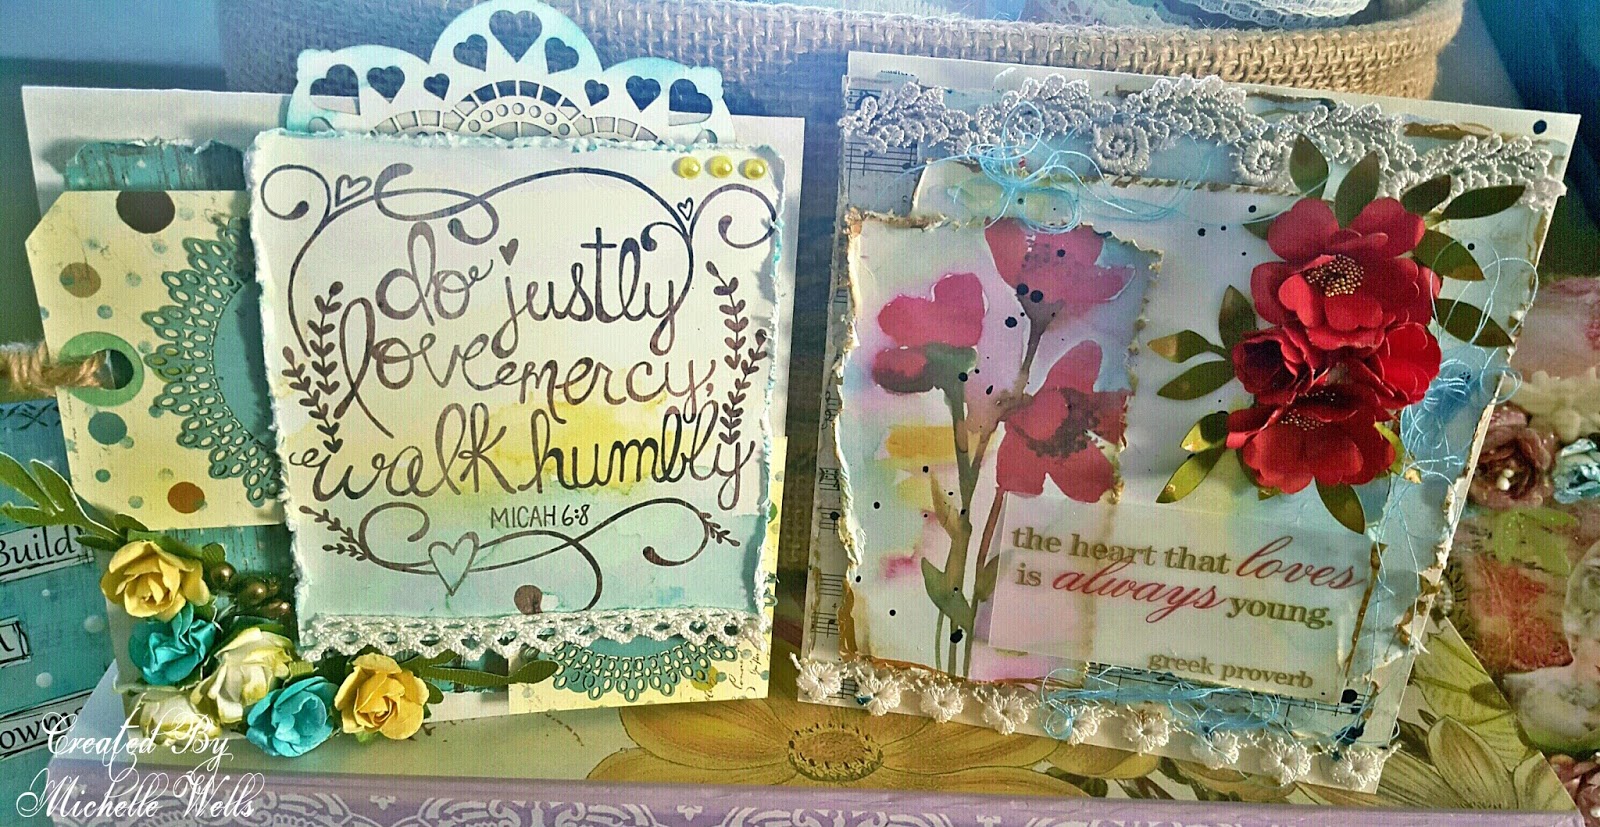
Not horrible results in not using the machine, but definitely a skill I need to work on.
 
I hope you find yourself inspired in my posting.
Not just in creativity, but to press beyond ANY challenges in your life.
 
Let go of that which weighs you down.
Adapt to living a better life
emotionally, spiritually, physically & mentally as well.
Make 2017 your best year yet!
 
Thank You so much for stopping by.
Please visit again soon.
Many Blessings! 

Friday, December 16, 2016

Outlander-ish Goodies

Spent the afternoon
on Thursday, visiting our nieces
and my sister-in-law, to take to the girls
an early Christmas present so they could enjoy it during their holiday break from school. and to my surprise, my hubby, and my sis-in-law, had "conspired" on a couple of things I so desperately have wanted for the winter months,
some knitted cowls.
Now just not any cowls mind you, but in particular
like the ones that "Claire" in the Starz series Outlander wears.
 
Well color me tickled pink, because
bless my sis-in-laws heart, AMAZING skill, and her recently diagnosed "tennis elbow", she not only made THE ONE, but a second one,
and a beautiful, beautiful
multi colored shawl.
 
THE ONE
 
Mine just needs to relax a bit

 
The bonus cowl
 
 
The BEAUTIFUL shawl
 
 
 This is one blessed and happy gal!
Just had to share the photos with you!
 
Until next time
Crafty Blessings!


Sunday, December 11, 2016

Festive Boho & Snowy Ornament

Festive Greetings
Everyone!
Welcome to INSPIRE.
 
If you read my last posting,
you know I have quite
a chaotic mess on my hands,
in trading rooms to increase
my crafting space.
 
However, I had a creative bug bite me,
and did a little creating
(away from the chaos)
and I wanted to share with you.
 
All projects featured
were created with supplies from
The Vintage Rose Emporium.
 
The first project,
is some Boho Glam inspired
earrings made with VRE appliques.
 
 
I chose vintage like findings, pearls, and other elements from my personal stash.
Each earring set, 
took less than 10 minutes to create,
but look elegant to wear to any holiday party.


The second project
I created is a delightful
ornament, a 
VRE featured holiday kit.


I began the project by cutting the 
Christmas design 20-sided paper featured
in the kit,  using one side as a background
inside the mason jar lid.
I then used a paper punch, to create flowers
from the other side of the paper.
 
I used clear aqua glue, to adhere
copper like beads to the points of the rusty stars, attached the tiny jingle bells with gold metallic thread, that I also used to dangle the stars from t he back of the mason jar lid.
 
With dimensional dots (and some glue just to add a bit more on securing them) I added the flowers to the inside of the lid.
 
On the backside, I used the venice style lace,
to create a snowflake of sorts, and finished using pearls & glittered ribbon to finish.


Final finishing touches, including adding the remaining glittered ribbon as a hanger of sorts, and adhering the acetate "snow" to the inside and outer topside of the lid, followed by puffy paint to enhance that wintery look.
 
 
And there you have it.
Projects that didn't take a lot of time to do,
and look as though I spent a lot of time on them.
 
Thank You for stopping by,
and remember
for vintage & vintage inspired
ribbon, bling, lace trim & so much more
visit
THE VINTAGE ROSE EMPORIUM.
 
 
Crafty Blessings!


Friday, December 9, 2016

Not So Fun Room Switcheroo

Hello Everyone.
Stopping by to share something,
not directly crafty.
 
In my massive amount of creating,
I am building a little "stock",
and running out of places to put them.
 
 I have began the journey of switching
the smallest room in our house
(which has been my craft space for a year)
back to the larger room that I had
originally started my craft space in.
 
It has not been easy, as I tend
to be a bit of a perfectionist.
So, the following photos
are the process thus far.


I still have quite a way to go,
in finishing the space with
some cheerful paint, including
painting the brown craft cabinet
white to match the other shelving
And I would love to find a mod/retro
designed area rug for the space.
 
My design board concepts
(luckily I found these on Pinterest)


A new year is just on the horizon
and I am hoping for
it to be full of possibilities for 
this creative gal, so I need the space
that inspires.
 
 
Thank You so much for stopping by.
 
Visit again soon.
 
Crafty Blessings!


Saturday, December 3, 2016

Glistening Snow Card Box

Happy Saturday Morning
to all of you!
 
 
Today for The Robin's Nest
I am sharing my tutorial
for how I "recycled" an old box, and transformed it into a
"Glistening Snow"
Card Box,
using GORGEOUS paper & embellishments
from The Robin's Nest.
 
You will find the details of
how I created this box following this link:
 
For the supplies I used, follow either link from below
 to The Robin's Nest Online Store.


Thanks for stopping by!
 
Crafty Blessings!

Friday, December 2, 2016

Festive Snowman

Hello everyone!
Welcome to INSPIRE.
 
Today I wanted to share my latest
creative endeavor,
my very first modeling clay figurine,
a festive snowman.


This has been a couple of weeks in the making,
but so worth the finished results.
 
I began this project with a
styrofoam ball as the body bass.
I then created the "head" with wading
a couple pieces of newspaper into a ball shape, then secured the ball with duct tape.


For the legs, I used two wine corks,
with heavy wire inserted, just slightly leaving 
 over a 1/4 inch long, to insert into the
styrofoam body for added support.


I formed the arms with the same heavy wire, wrapped in newspaper & duct tape, leaving wire to insert into the body, and added wire to the base of the head as well.
To completely secure all joints, I used
permanent epoxy glue.
 
Once the glue had set, I covered the entire snowman with texture paste, to give a snow like texture.
Followed by 2 coats of white gesso, and sprinkled with glitter while wet, as to set glitter as it dried.
 
 
For finishing touches, I used black seed beads to form the mouth, added the clay "carrot" nose I created with clay and painted, and used
The Robin's Nest Dew Drops
in black, for the eyes
(The link to The Robin's Nest
online store is below)
gave him rosy cheeks, and some snowy goodies to hold.
 
The snowman's stand is a candle tin
covered by fabric tape, and embellished with a metallic jeweled snowflake.
I made his hat out of felt, and added glitter glue in baby blue, to give a frosty look to the top edges.
Velvet ribbon around his neck & the trim on the hat, completes his look.
 
 
I couldn't be more thrilled with the finished project.
I hope you enjoy it too!
 
 
Thanks so much for stopping by!
Visit again soon.
 
Crafty Blessings!
 
*The Robin's Nest*


Thursday, December 1, 2016

The Robin's Nest Collection of the Month

Hello
I wanted to share with you
the link to
The Robin's Nest Collection of the Month
"The Wedding Collection".
 
 
Whether you are making a wedding card,
or creating an album full
of joyful memories,
this collection is the perfect touch,
with it's elegant paper & cardstock.
 
Visit
The Robin's Nest
for ALL your paper crafting supplies!


I Believe In Angels

Hello there.
Thanks for visiting INSPIRE.
 
 
I am dropping in to share one of many
projects I have created as of late.
 
An angelic vignette.
 
I created this project for
The Vintage Rose Emporium.
An online store featuring
FABULOUS
Vintage/Vintage Inspired
ribbon, lace, bling & more.
Be sure to follow the link below
and visit VRE.
 
I began this project with
a couple of different size
vignette boxes.
I first used a light coat of gesso
to cover each box.
 
Then to the outside of the boxes,
I covered with an elegant foiled paper
using a matte medium.
On the inside, I used vintage sheet music
applied with an antique decoupage.
 
 
I chose the beautiful cherub face as well as selections of bling, buttons and applique wings
all from VRE.
 
I lightly added sheen to the cherub, frozen charlotte, and even applique wings, using metallic rub on medium, and Perfect Pearls Pigment Powders.
 
 
The results, vintage with a hint of elegance.


Thank You so much for visiting.
 
And remember to visit
The Vintage Rose Emporium
for your vintage style
 
Crafty Blessings!